Category: Brighton film production

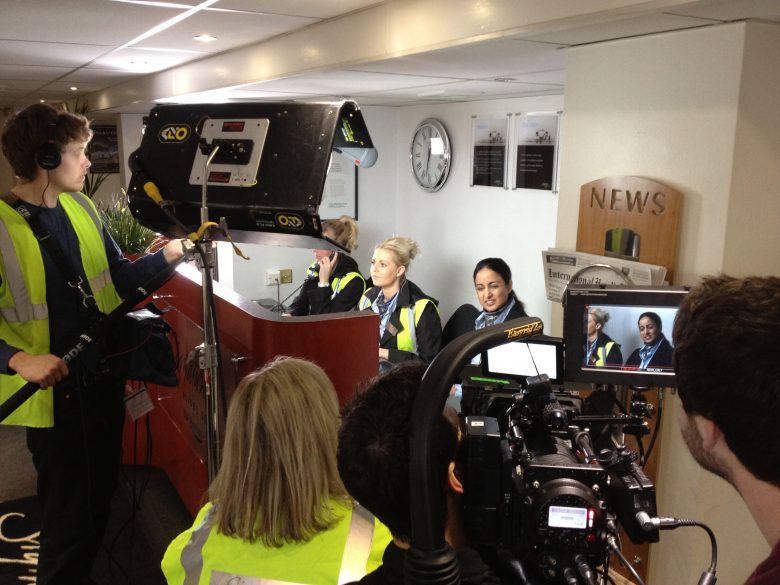
Pitch Hill – Behind the scenes

Video Production – Behind the scenes at Surrey Hills

All of us here at fly love a good documentary, and we’d decided it had been far too long since we all made one. The last one we produced was The Lurcher’ way back in 2014, which proudly for us was a runner-up at the Sony Production Awards 2014.

We knew we wanted to make something beautiful, insightful, and emotive and whilst we were researching possible topics, we came across mountain Biker Phil Grundy who lives in Brighton. His story was simple on the surface, he loves mountain biking and often goes out and rides – but after chatting with him more we realised that mountain biking to him is so much more than just a sport. Although his life has taken a number of twists and turns: from injuries to business struggles, mountain biking has always been his anchor and his focus to pull him through the dark times: It was this idea that we wanted to explore.


blog_stills

Phil getting ready for the day


We decided to shoot the film in Surrey Hills as Phil has ridden the trails there before and knows it well. We wanted to make sure we arrived before sunrise to capture our opening scene of Phil setting up the bike, but if we had known how cold it was going to be, maybe we would have waited! If the cold wasn’t bad enough, we also had to lug all of our camera kit up and down the bike trails!


2017-01-20 11.53.45

A beautiful (but cold) day in Surrey Hills


We knew that we wanted the film to have a very slow, atmospheric and emotional tone, so we decided to shoot everything in slow motion (because what doesn’t look good in slow motion!) We have access to a great range of cameras here at fly, but we decided to use our Red Epic for this shoot. The high dynamic range and resolution combined with the high frame rates offered (300fps at 2K resolution) gave us a great deal of shooting flexibility.

The red was primarily attached to a Manfrotto 529B Hi-Hat Tripod. Being lower to the ground meant that we could get some really beautiful low angle shots of Phil as he took off from the jumps, but it also meant we could be closer and get a better perspective for our super slow motion shots.


2017-01-20 11.54.13

Our Red Epic shooting at 300fps for some lovely slow motion


The weather played a crucial part in bringing this film together. The shoot had to be called off the week before because of snow (did I mention how cold it was?) but luckily, this time we were treated to a gloriously sunny (but cold) day with a perfect sunset.


SANTA CRUZ EDIT .00_03_18_23.Still011

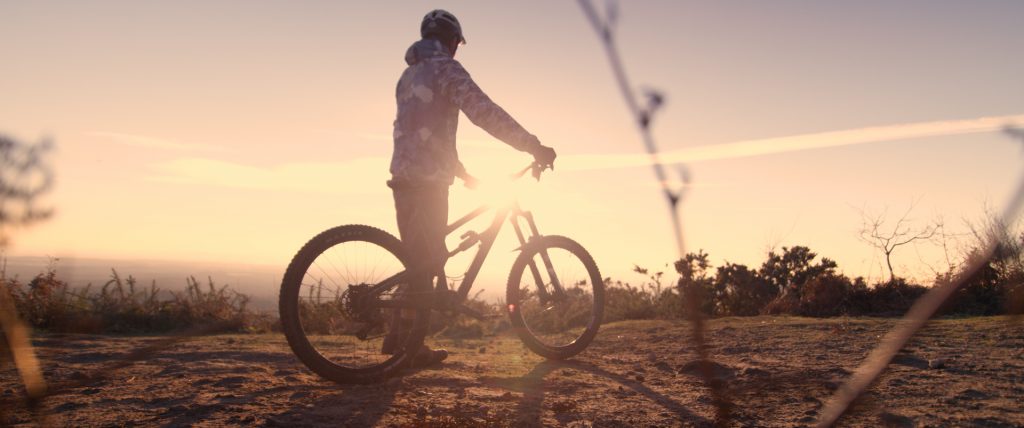
Phil standing in front of a perfect sunset


We’ll be submitting this film into action sports festivals and it will be live on Vimeo, where we hope it might even catch enough attention to garner a coveted staff pick!

We love creating stories like this for brands and what sets these type of films apart from the traditional brand film is that they give one a sincere insight into a person’s lifestyle and what the product genuinely means to them.

If you’d like to know more about our unique approach to brands then please get in touch, we’d love to hear from you!

We hope you enjoy watching it as much as we did making it.

Dan

More stories from fly

http://mustard.education/portfolio/the-lurcher-a-film-about-a-banjo-maker/

http://mustard.education/portfolio/visit-london-celebrate-christmas-in-london/

http://mustard.education/portfolio/knowhow-openingceremony/

TV look with crew

Achieving the TV look on an online budget

It’s 2016 and the marketeers are telling us to invest in online video. We are hearing many reasons for this:

“It will help your SEO”

“It’s cheaper than TV advertising”

“Your audience can be targeted on their commute, at home and at work

All very good reasons, sure. But once we have accepted that we need to invest in online video, how can we make sure that our content looks good enough to be on TV yet stays within the realms of an online budget?

Whilst anyone can in theory take out their phone, shoot a video and upload it in seconds to their website and social media channels, businesses who care about their image and production values (I imagine that’s most of us) will certainly get better value from investing in professional online video. Gone are the days of dull looking corporate videos. We’re in the age where online advertising should look as good as TV!

So, how could you get the TV look on an online budget?

Through utilising cost effective technology.

TV look Ronin

Getting the TV look (or even the film look!) with the nimble DJI Ronin

One of the major benefits of opting for online content rather than broadcast media is that the fast moving digital landscape is allowing technology to be more affordable than ever before. You’ll have already experienced it with your electronic devices at home and the same applies in the video production industry. Cameras that produce beautiful images fit for broadcast are now within reach. As a result we use everything from larger cinema cameras to tiny DSLRs to portray your business in the best light. To keep things economical we buy some of the equipment outright whereas other bits are more cost effective to hire. This ensures that we can provide quality equipment all year round and still have access to anything specialist or brand spanking new when you need it, getting the best of both worlds.

Another example is in the aerial photography world. As HD cameras have gotten smaller they have been easier to attach to UAVs – aka drones! Only a few years ago aerial photography was too expensive a venture for most businesses; drones are obviously much more cost effective than helicopters!

If you have an interest in tech then you might like this article on how to choose the right camera.

It’s not just the camera: lighting & sound are important too.

One of the cons of this technology becoming affordable is that suddenly everybody considers themselves a Video Producer. Some think they can just buy an HD camera and become a professional without considering other areas of video production. What contributes immensely to creating a high value production or the ‘TV look’ is lighting and sound and at flyCreative we respect that. Just because you may be considering a less expensive option that doesn’t mean your product should be cheap!

A little bit more on lighting:

Only fairly recently have many cameras started to become good in low light conditions. However despite this, even big TV programmes today still require the use of lighting rigs. Next time you are watching X Factor take a look at the background of the wide shots. You’ll often see a large film light of some sort. Apart from being able to see the subjects, lighting is used to make people look good! Don’t you want your business to look good?

With an untrained eye it can be easy to accept a TV image as ‘real life’. Trust us though, you’ll notice the lighting when it’s gone. Or if it’s bad!

Music to the ears: 

The other half of achieving the TV look is through getting good sound. When it’s not good you’ll notice it and will wish that you’d hired a professional. To maintain TV production values on an online budget we also take our sound very seriously, using broadcast quality microphones and recorders to ensure clarity and noiseless recordings. Some projects require their own sound recordist, just as in TV.

As online productions are usually smaller in scale than big TV shows, there is less of a requirement for large lighting rigs, mixing desks and huge teams of personnel which can add substantially to the cost of a production. Portable lighting kits, solo sound engineers and self shooting producers are more widely used than ever before. The number of crew required will depend on your individual requirements, but generally speaking the crews are small for online content.

Through planning and creativity, except you are in control.

Creating content for broadcast can sometimes be a little restricting. All of the major broadcasters such as ITV and SKY have strict broadcast guidelines regarding what can be considered ‘fit for broadcast’. Whilst legal issues such as libel, defamation and copyright breaches aren’t exactly blown under the carpet when it comes to producing online, the truth is by not having so many restrictions and guidelines to meet you can effectively have a lot more freedom when it comes to the kind of content you want to produce, how long that content should be and when you want to release it. With broadcast advertising you may also be competing with many other organisations, all after the same airtime. This can once again hike up the cost. Obviously, to get the most engagement from online distribution you should have a well informed social media and marketing strategy in place.

The beauty of having freedom to create whatever you want (within reason!) means that it’s easier to innovate and choose an idea that hasn’t been done before. This can increase the likelihood of your content being shared and for some, can even mean going viral. Remember, it has been accessibility to content on social media that has helped many adverts (that were originally made for broadcast) go viral. Do you think the Old Spice adverts would have had as much success if they weren’t shared on social media?

Need some inspiration? Take a look at this promo for Virgin Holidays where we got a bit creative. Cinematic slow motion cameras were used to capture members of Cirque du Soleil performing acrobatics on the streets of London.

http://mustard.education/portfolio/virgin-holidays/

The finishing touches to the TV look: post production.

To get the TV look it’s not just about the shoot itself but what we do to the footage afterwards. Colour grading, as part of the editing process, is used to enhance the images so that they help evoke a certain emotion from the audience. This can make your brand stand out from the crowd. Once this is done titles, text, motion graphics and animation can be added to further enhance the production.

The video below is a good example of how a project was really brought to life through post production. Not only did we shoot a range of material to promote London in the summer through the use of steadicams, drones and slow motion filming, but we added warm flashes of colour throughout to give off a summer flavour and produced some small animations along with the text. There’s a lot going on here and it certainly looks fit for TV.

http://mustard.education/portfolio/visit-london-summer-in-the-city/

Don’t forget..optimise your content for your chosen demographic!

Just because you’ve got your content looking like it should be on the telly you must not forget one of the key reasons for choosing to advertise online in the first place. Your creative freedom and a flexible online budget can allow you to customise your content for particular audiences; from simply adjusting the title cards for each audience to creating specific ads for each demographic. Once again, timing of release is crucial here too. What time of day are your customers most likely to be online? With so many options available, it’s down to you to decide what you would like and we will help you realise your vision.

And another thing..

The recurring theme here and the key difference between producing content for TV and online is the scale. Whilst there are many technological savings to be made and in ways a lot more freedom to produce the content you want for online, you will still have to consider the scale of your production. Hiring 50 extras to star in the background of a promo in London Victoria Station is still going to cost a fortune, regardless of whether it is for web or TV. If you are prepared to think big but balance it with realism then there is no reason why you can’t make substantial savings and still walk away with an incredible advert for your business.

To find out how we can achieve the TV look in your online production come on by and say hello!


A beginners guide to lighting gels

Gels are used by cinematographers and videographers to balance the colour of light sources, adjust contrast and control shadows. It is the use of these gels that helps to create certain moods and looks to productions, whether that be low key drama or high key corporate video.

If you don’t know your ND from your CTB then read on as I introduce some of the most popular lighting gels and demonstrate how they may be used in your productions for creative effect.

CTB

CTB (not to be confused with CBT!) stands for colour temperature blue and is often referred to simply as ‘daylight’. It is used to convert tungsten balanced light sources such as traditional household bulbs and fresnels from 3200K to 5600K. It’s a common gel for balancing artificial light sources to daylight when the sun is acting as the key light in a scene.

With our camera balanced to daylight and using a tungsten light source, our professional model looks like he should be in TOWIE..

5200K_FULL_DAYLIGHT_GEL

..so by applying FULL CTB the skin tone looks a bit more natural now.

5200K_HALF_DAYLIGHT_GEL

If your subject has a lighter skin tone or if your camera’s auto white balance reads around the 4500K mark (for some fluorescent lighting), you may want something in the middle between tungsten and daylight and HALF CTB may be your answer, converting tungsten sources to 4300K. In this shot the camera is still balanced to daylight.

  • CTO

Another popular colour correction gel is CTO which stands for colour temperature orange and is often simply referred to as ‘Tungsten’. It is used to convert daylight 5600K sources to 3200K, in line with the colour temperature of most traditional household lamps.

3200K_NO_TUNGSTEN_GEL

Using a daylight balanced LED light and with the camera balanced to tungsten, our image is looking a bit cold. But there is a use for this though; it is a popular method of simulating moonlight as well as shooting ‘day for night’.

3200K_FULL_CTO_GEL

But if moonlight isn’t what you’re after, FULL CTO will return the skin tone back to a more natural colour.

3200K_HALF_CTO_GEL

HALF CTO converts 5200K to 3800K, so a little cooler than FULL CTO but not too far off. With the light I’m using (dedolight ledzilla) and the model’s skin tone in this case HALF CTO actually looks a little nicer.

Both CTB and CTO also come in other strengths including QUARTER and EIGHTH, for those more subtle differences, but FULL and HALF are the most widely used.

  • ND

ND stands for neutral density and is used to reduce the amount of light without altering the colour. ND is often used on the camera in filter form but for lighting it can be invaluable in helping to control exposure and contrast. Using ND to reduce powerful light sources that do not have dimmers (or if you don’t want to change the colour temperature of the source through dimming) or stopping natural light from washing a scene out through covering windows with these gels, it is an incredibly useful tool.

NO ND

Oh no, you can see that I forgot to iron my backdrop..so in this shot as you can see our model is looking a bit ghostly. Time to crack out the ND.

1 STOP ND

ND.3 reduces the light by 1 stop.

ND.6 reduces the light by 2 stops.

ND.6 reduces the light by 2 stops.

And ND.9 reduces the light by 3 stops.

And ND.9 reduces the light by 3 stops.

Wise words a gaffer once said to me, “you can never have enough ND!”

  • Diffusion

Diffusion is used to control the softness of shadows and the softer the source the less prominent the shadows will be. As hard lights have typically much higher output than soft lights, diffusion is key to softening these sources whilst utilising a strong beam.

There are so many different types of diffusion available and it can be difficult to know where to start so here are a few examples to give you an idea of the range available. At the end of the day it’s down to you to experiment with various types and find what you like.

NO_DIFF

Our professional hand model is currently being lit with a hard LED source (Dedolight Ledzilla) and no diffusion.

HAMPSHIRE_FROST

This diffusion used here is HAMPSHIRE FROST. Notice a subtle softening of the shadow.


HEAVY_DIFF

HEAVY DIFFUSION is being used here (and it’s easy to see why it got this name)

CLOTH1

I don’t actually know what this diffusion is called but it somehow found its way into my kit. A thicker, rougher sheet that is a little closer to greaseproof paper. As you can see it has a lovely texture to it and can add a bit of spice to a background.


It’s important to note too that the further a piece of diffusion is away from a light source, the softer the shadows will be, as will be a slight reduction in overall output of the light. See the example below:

HALF DIFFUSION attached to the light..

HALF DIFFUSION attached to the light..

HALF_DIFF_FURTHER_AWAY

..and the HALF DIFFUSION moved away from the light source (closer to the subject). Notice how much softer the shadow is now.


  • “Party” gels

Not necessarily an official term but in this case I shall refer to most other coloured gels as ‘party gels’. Whilst these may not be as important for most shoots as the colour correction and other gels mentioned above, they can be used to create certain moods for your scenes whether they are used as key lights, backlights or kickers. There are an almost endless number of these gels to choose from but here are a couple of examples.

3200K_STEEL_GREEN

STEEL GREEN with the camera balanced to tungsten. Sci fi!

STEEL GREEN but with the camera balanced to daylight.

STEEL GREEN but with the camera balanced to daylight. Lord of the Rings or Matrix?


3200K_STRAW

More subtle than the above, a STRAW lighting gel with the camera balanced to tungsten. A nice morning light look.

5600K_STRAW

A STRAW gel but with the camera balanced to daylight. I’m getting a CSI Miami vibe here.


So, which gels should you buy?

It all starts with the light source(s) that you’ll be using most. Their colour temperature, power, whether they are dimmable and how hard or soft they are will all determine the gels you need. Aspiring DOPs will probably accumulate gels over time as their portfolio grows, but a good place to start is with the simple colour correction gels (CTO and/or CTB) and some diffusion which are the bare bones for lighting anything professionally. Another thing, don’t always rely on kit hire companies to stock a wide range of gels!

Big D Jonny boy

Experimenting is key to finding lighting styles that will grab your audience’s attention.

Use of softbox fill Liquiproof

Part of the fun and the craft of being a DOP is finding lighting styles that fit your productions and consequently help you to create your own signature style. Experiment with gels and see which colour combinations work and which don’t. Get creative!

Whether you are new to lighting or not, the LEE filter comparison tool here is a fantastic resource to see the range of lighting gels available and help you make decisions on what to buy. LEE filters are widely considered the number one name for gels; heat proof, colour accurate and with a huge choice available, they are an essential investment if you’re an aspiring DOP.

Happy shooting!


P.S. This post would not have been possible without my trusty light meter. Here are a few reasons why every aspiring DOP simply must have one.

Why, when and how to use a clapperboard

“Lights, camera..action!”

This is probably the most well known phrase associated with Hollywood and film making.

If you’ve ever watched those little behind the scenes extras on DVDs you’ll have probably seen at some point a crew member using a clapperboard. Standing in front of the camera before it rolls, shouting out some random numbers and letters before hitting the sticks together and preceding to hurry out of shot immediately afterwards. Have you ever wondered what the point of this little device is? If so, then look no further.

Clapperboards are pretty fun things and they make fantastic decorations (especially if a production or director’s name has been inscribed on it!) but they are actually very important tools in the film making process. Understanding why we use them, when to use them and how you should be using them can not only help you act professionally, but potentially save you time and money, depending on your production

clapperboard close up

Clapperboards give the editor lots of information about the production which can assist in navigating large amounts of footage.

Why do we use them?

Lets turn back the clock to an age where 35mm and 16mm film were the standards for most people making movies. When the first ‘talkies’ were released way back in the 1920s, that is films that featured synchronized picture and sound, the sound was not recorded onto the film but separately (using a sound on disc system, recording to wax records). Early film cameras were also very noisy which contributed to the difficulty of recording live sound. Fast forward to the present day and in the 21st century on movie sets the sound is still recorded separately, albeit to designated sound recorders, rather than straight into camera. The primary purpose of the clapper board back in the early days and in the present is the same; to help sync up the visuals and the sound in the cutting room.

When do we use them?   

You may be thinking that in this day and age, why are we still recording sound and visuals separately? Isn’t the technology good enough to record both in one? There are actually many reasons why we still record separately. Firstly, being able to separate the camera operator and the boom operator means that the camera isn’t restricted and is free to move however the director wishes. The sound recordist and sound mixer are also free to record from multiple sources; using radio mics on each of the actors and/or condenser mics for room ambience for example. Furthermore, designated sound recorders are manufactured to record the cleanest sounding audio possible, whereas most cameras aren’t designed with this in mind.

So, we use clapper boards whenever the highest quality audio is required and when the situation allows.

using clapperboard

Tip: If clapping close to an actor it is good etiquette to do a quiet clap for the sake of their eardrums!

How do we use them?

On feature films, the 2nd Assistant Camera is responsible for the clapperboard. On a smaller production a camera assistant or even a runner could be responsible for this.

Every single scene, slate (another word for shot), take and roll is written onto the board to signify the part of the production that is being captured. Sometimes audio clip information might be included too. The production company, director and cinematographer is also written on the board along with other important information such as the date, the frame rate of the camera for that particular shot, the shutter speed or angle, scene information (whether it is day or night, interior or exterior) and finally, whether sound is being recorded and synced or if there’s no sound (mos).

Slating scenes accurately is crucial so syncing up the footage with the sound in post is a smooth process. Added to this, having visual logs for every shot allows the editor to sift through rushes quickly, knowing exactly which point of the film he or she is at, rather than having to watch or listen to every take in full. For most scenes a loud clap is required to create a noticeable spike in the audio levels, making syncing a breeze.

What kinds of clapperboards are available?

Make no mistake, there is such a thing as a professional clapperboard. Although you can find cheap ones in fancy dress shops or on eBay, these are not built to withstand the daily rigors of set life. From inexpensive chalk boards to fully digital acrylic boards with inbuilt timecode, there are many options available. Boards with timecode allow both the camera and sound departments to be perfectly synced all the way through production. You can even sync footage using an iPad with this handy app (but it’s not quite the same in my opinion!).

If you are looking to purchase a clapper board in the UK then I recommend these guys who offer a wide range of boards to suit various budgets. It’s where I got my first one and she’s still going strong!

Sometimes it's good to have options

Sometimes you have to record straight into camera, and that’s OK (although some cameras are better than others for this)

As with all tools, there is a time and a place.

Make no mistake, there are certain situations where a clapperboard is not essential. Sometimes you have no choice but to record sound directly into camera (events, video journalism, documentaries etc.) due to time, budget & personnel restraints. In some situations the effort required to record sound separately and sync it up afterwards actually gives you more work with little noticeable gain, costing you time and money. Decide carefully if a board is for you and how often you may use it.


An example of  a typical slating process on set when sound is being recorded:

1st Assistant Director: OK, silence please. We’re going for a take. Turnover.

Sound mixer: Sound is rolling!

Camera operator: Camera speed!

2nd AC: Scene 41, slate 6A, take 1, mark.

[2nd AC claps then leaves shot]

Camera operator: Set.

1st Assistant Director/Director: Background action! And..action!

Slating shots that have no sound

For shots without sound the 2nd AC would highlight ‘mos’ (motor only sync) on the clapperboard and when slating would put their hand in between the sticks, hold it in shot and not clap.

Syncing at the end of a take (end boarding)

For those moments when syncing at the start of the take isn’t possible then the 2nd AC will clap at the end of the take, turn the board upside down and add ‘on the end’ after they’ve marked it.


So there you have it. Hopefully you’ve found this information useful so that when you’re next armed with a clapperboard you’ll know exactly what to do. Now as you return to creating great work, you might just find yourself being a little more efficient. Happy shooting!


Why a reflector is your most important lighting accessory

The 5 in 1 reflector: cheap and incredibly useful

Cheap, light and with so many uses, your 5 in 1 reflector is a lighting accessory that should accompany you on every shoot.

Lighting in video production is not just about flicking switches. When I was just starting out as a freelancer I was guilty of believing this; that lighting simply had to be turned on and that was that. I recently wrote about how lighting could actually be more important than the camera itself and that lighting can sometimes be deceptively simple but what should be noted here is the idea that the subject isn’t always referring to the lights themselves but to the modifiers as well. In fact, I’d say that half of lighting is actually modification. Flags, floppies, bounce, scrims, nets, diffusers..there seems to be so many different lighting accessories about that it’s hard to keep track of what they actually do. These items are all examples of lighting modifiers, however in this case I’d like to focus on the simple 5 in 1 reflector – a low cost, multi use modifier that really is an essential tool for any film maker.

But it’s just a reflector?

No it’s not. If you’re thinking that, you probably haven’t explored the many uses even the cheapest of 5 in 1 reflectors has to offer. Having 5 different sides allows you to do a lot in a variety of shooting situations whilst remaining portable and convenient.

Lets take a look at the different sides of a typical 5 in 1 reflector and how you might use them in your moving image productions:

White

Tip: If you need something bigger to bounce, polystyrene board is cheap, light and in your local DIY store

Tip: If you need something bigger to bounce, polystyrene board is cheap, light and available at your local DIY store

Any white reflective surface is often referred to as ‘bounce’, the reason being that a hard light is bounced off the surface and onto the subject to create a nice soft light with minimal shadows. Your hard light source could be a powerful tungsten lamp or the sun.

Soft light is commonly used in corporate environments

Look at the difference between a hard light shone directly at the subject (left) and a hard light bounced off a reflector (right)

Look at the difference between a hard light shone directly at the subject (left) and a hard light bounced off a reflector (right)


Bounced light can be used as the key light (main light source) when even lighting is required or as fill (to fill in shadows created by the key light) when a higher degree of contrast is needed. It is commonly used in all matter of video and film productions for a flattering image.

Black

Tip: If you need a flag to block out a large area such as a big window a tarpaulin is an effective solution.

From experience, you can never have enough flags.

Your matte black surface is vital in situations where you want to cut out light. This could be to control exposure, shape light or even remove light from the image entirely. It is often referred to as ‘flagging’ or providing ‘negative fill’ and you would be surprised at the number of situations that you might find the need to do this.


For situations where your reflector might not be big enough a tarpaulin is a great way of flagging a large area such as a full window

For situations where your reflector might not be big enough a tarpaulin is a great way of flagging a large area such as a window.

Can't see your screen? A flag would be handy here..

Having difficulty viewing your LCD screen? A flag would be handy here..

The problem with powerful key lights is that it’s easy to lose control of them, in that light can get in some areas of the image that you don’t want it to. Some lights have barn door attachments which can help but this may not always be enough to control the spill. Simply holding up a flag can make all the difference. The other thing to consider is how long you are filming for and if natural light likely to change throughout your shoot. Flagging any uncontrollable light sources allows you to start from scratch and build your lighting design from the ground up, even allowing you to shoot night scenes during the day!

To control the highlight in this image a flag was held partially in front of the light source so it didn't wrap around the face too much.

Without a flag partially cutting the back light, the beam here would have over exposed half the actor’s face.

Diffuser

Tip: There are many different types of material that diffuse light in varying amounts. One popular and cheap method of diffusing large sources on low budget films is to use a shower curtain.

Tip: There are many different types of material that diffuse light in varying amounts. One popular and cheap method of diffusing large sources on low budget films is to use a shower curtain.

Sometimes you may not want to directly cut out light but soften it instead, so it creates more subtle shadows. Hard light sources such as direct sunlight can create strong shadows and too much contrast as a whole, in which case placing the diffuser between the light source and the subject can make it appear much less harsh. The surface of your diffuser may appear similar to the bounce but on closer inspection you’ll find it much more translucent.

lighting at kinetico cropped

Hard light shone through a diffuser is softened but without a huge reduction in overall output.

4X4-TRACE-FRAME-460x346

The diffuser is essentially a cheaper (and more portable) version of a trace frame.


By diffusing a hard light source you are able to soften the light but also keep the spread. Moving the diffuser further away from the light source will soften the shadows even further.

Tip: Another popular low budget method of creating higher contrast is to use tin foil.

Tip: Another popular low budget method of creating higher contrast is to use tin foil.

Silver

Silver is incredibly useful in creating contrast quickly, by making certain parts of the image ‘pop’ out from the rest. Whilst it must be used carefully to avoid blinding the subject, it has a surprising number of uses such as creating highlights (areas of the image that are deliberately over exposed for creative effect), filling in shadows and for creating texture (such as a rippling effect from light reflected off water).


Silver - a bit more kick to your fill than normal bounce.

It can provide a bit more kick to your fill than normal bounce.

Silver can be used to create a rippling water or a 'glow from the TV' effect.

The uneven texture of silver means it can be used to create effects such as that of rippling water or a glow from the TV. Easiest to see in a moving image (yes, watching breaking bad counts as work!)


Tip: Although not as powerful as silver, gold can help increase the contrast in your image too.

Tip: Although not as powerful as silver, gold can help increase the contrast in your image too.

Gold!

Always believe in your..

Ahem.

In my opinion this is the least useful of the 5 for the moving image, but it still has some useful applications. Gold is mostly used for creating a warming sunset effect or for texture and can be particularly flattering in fashion and beauty films.

An up lighting effect for warmth.

A subtle up lighting effect for a bit of warmth.

So there you have it – your reflector has so many uses that it really is your most important lighting accessory – and I’ve only begun to touch the surface. Bouncing, diffusing and flagging each deserve their own articles but just knowing how you can start doing these modifications with your reflector will take you a step closer to raising your production values, and that’s whether you’re in a studio or on location and working in controlled settings or operating run and gun.

If you care about production values then there are really no excuses for leaving your reflector at home. In fact, once you start utilizing one you’ll probably want another (and if you need to google how to fold it back into its bag, that’s OK – we’re all guilty!).

Happy shooting!

Before you go..
Download our free ebook

Mustard-Education-Video-ebook

7 Steps:
Make your school’s video
content pay for itself

  • How to use your new video to attract attention and get the results it deserves
  • How the most successful independent schools are getting all the new enrolments
  • The techniques that will give you a clear, predictable return on your video investment
  • How to track and record ROI to prove your video strategy’s working